Showing posts with label outside. Show all posts

Monday, October 31, 2011

puddles puddles everywhere

We have taken a step back from projects, first allowing our class to develop a culture of thinking and thinking language. We do this by focusing on building a 'thinking' foundation, posing questions, modeling thinking and wondering aloud, and providing opportunities for engagement. Yet, even with project work taking a backseat for the moment - the visible interest in water and puddles is too evident to ignore. In an effort to make the children's thought process about puddles and water visible we created a See/Think/Wonder chart. This is a thinking routine, you can read more about thinking routines in this paper by Project Zero and you can find many more great resources about thinking routines here at Project Zero's Visible Thinking Site.

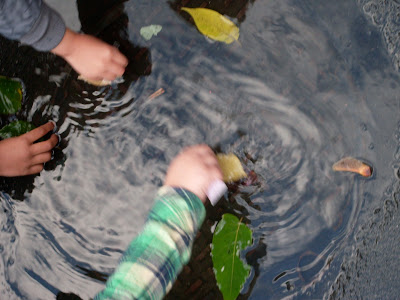
First we observed a photo of children exploring a puddle the day before. Then...


Children respond to what they see: water, stuff in the water, it's a puddle, the water is shaking, and we can touch the water

Children respond to what they think they know about puddles: that puddles are very big or very small, puddles look like circle, and puddles are watery but you can jump in them.

And children wonder: If we could get bottles to measure water.
 
As I write this I realize I have  forgotten to pose an important question to the children. What is interesting about puddles? Looking at the images below I can make assumptions - why I think puddles are of interest to children. If you look at the images below, what would you say provokes interest? This is an important step as an educator, forming our own theories and then revisiting those theories...


Tuesday, April 27, 2010

squiggly, wiggly, jiggly WORMS

We have been learning so much about our natural world this month! We were lucky enough to watch two groups of butterflies as they moved through the life cycle. from caterpillar, to chrysalis, to observing the butterflies emerge - it was a wonderful process to witness. Of course we freed our winged friends and waved goodbye. We only went two days before getting some new friends in our class. This time they're not insects but invertebrates...worms! That's right we are compsoting in our own classroom with the help of 1,000 Red Wiggler worms. Children are very excited to gently touch them and watch them "dance."

To read more about worms, click here. You can even learn the steps to building your own compost bin at home!
http://yucky.discovery.com/flash/worm/pg000222.html

Here's a great viseo about a boy, Kevin, who loves to compost. Watch him compost at home!
http://pbskids.org/dragonflytv/show/wormfarm.html

Friday, March 19, 2010

Taking our seeds outside


A small group of children ventured outside with Mrs. Chin to prepare the soil.


We planted the seeds.


Children even labeled popsicle sticks so we know what the plants are when they begin to sprout!

The children are incredibly curious about everything having to do with nature right now. Their curiosity has led them to ask the following questions...How do roots grow from seeds? Why do seeds need sunlight, air, soil, and water? And what are the names of the birds we see outside? We are working to answer these questions each day through exploration inside and outside.

Wednesday, March 17, 2010

Plants Plants Plants


We have started the indoor portion of our gardening. Boys and girls in the science center planted two sets of seeds. Organic seeds of: lettuce, spinach, broccoli, and swiss chard were soaked in water for several hours. A second group of seeds (the same vegetables) were planted directly in the soil without soaking them. We made predictions about which seeds would sprout first. The children in the group all felt the seeds which had not been soaked would sprout first. As T said "The one we put in the soil because we put the seeds first." So we will be carefully observing to see if there is a difference in sprouting time!


It's not all about science though, children represented their understanding through artwork as well. Children used egg cartons, clay, and collage materials to create their own garden. Once finished, those that wanted also wrote their own book to go along with their garden.

Tomorrow we will take our gardening outside, to a small plot of land in the back of the school. Also parents don't forget about our upcoming field trip to Queens Botanical Garden!If you can make it that would be great, the more parents and grandparents the merrier. We'll be participating in their workshop about "Plants We Can Eat," let's hope for a warm and sunny day!

Wednesday, February 24, 2010

snow day fun day


We read the story Sun Bread twice this week and were inspired to make our own sun bread. In fact today was supposed to be our baking day...but the snow day got in the way! In the story, after the baker shares the warm, fluffy, puffy sun bread with her friends in town the real sun breaks through the clouds and a celebration is had by all. After reading the story in class, two (gray) days in a row, I asked the boys and girls if they thought the sun would shine through the clouds after our sun bread was made. The class was split in half on that theory. We didn't get to make our sun bread today but with just a few ingredients you can at home! The recipe is below. Happy sunny snow day!


Sun Bread Recipe

* Mix Well:
3 eggs
3 tablespoons sugar


* Combine:
2 cups sifted all-purpose flour
1 stick butter, softened.


* Add the egg mixture to the flour mixture and beat well.


* In a small bowl combine:
2 packages active dry yeast
3 tablespoons lukewarm milk
Let stand until mixture is foamy, at least 5 minutes.


* Add the yeast mixture to the batter and stir. Knead dough on greased, floured surface for 8 to 10 minutes.


* Place dough in greased bowl, cover with a cloth, and let rise in a warm place for about an hour.


* Punch down dough, knead for a few minutes, then separate into two portions.

* To form the sun's face, shape one portion of dough into a round, somewhat flattened ball, then place on a large greased baking sheet. With the greased end of a wooden spoon, or with your finger, punch two "eyes" in the sun; draw a mouth for your sun in the same way. (Make sure you make deep lines and holes in the dough so they won't close up while the bread bakes.) Make a nose for your sun by securely attaching a small ball of dough to its face.


* To make a corona for your sun, roll one half of the remainder of the dough into four or five long "snakes." Then curl the snakes into puffy "snail" shapes. Shape the rest of the dough into puffy triangles. Firmly attach the snails and triangles to your sun's face. (Use a little water if the dough is too dry.)


* Cover the sun and let it rise again in a warm place for about an hour.


* Preheat oven to 400 degrees. To make your sun shiny, brush it with an egg wash (a beaten egg with a few drops of water added), right before baking. Bake the sun bread for about twenty minutes. Test for doneness by inserting a toothpick into center of bread . (It should come out clean.)


* Enjoy! Your sun bread is delicious plain or with butter, honey, or jam.

LinkWithin

Related Posts Plugin for WordPress, Blogger...